Home
Wing Attach
History/Background
Empennage
Flap/Aileron
Fuselage
Finishing 1
Finishing 2
Finishing 3
Flight Controls
Rudder Pedals
External Step
Seat Backs
Pitot Static Line
Aft Top Skin
Skin Time Lapse
Instrument Panel
Wing Top Skin
Electric Aileron Trim
Attaching Tail
Canopy
Landing Gear
Wiring
Destinations
Sale Items

RV-6A Project Website

Flap/Aileron

Left Wing

rv6a.jpg

The wings in the Quick Build kit arrive as shown above. They require the aileron and
flap to be attached, as well as the aileron control rod and bell crank. Later, the flap
actuator rod is added through the baggage compartment for control of flap
movement.


rv6a.jpg

This photo shows the aileron mounted and the control rod and bellcrank installed. A hole is first drilled in the approximate location on the rear wing spar, then reamed open to allow the control rod to swing through its arc during up and down motion without hitting the spar. Then the control rod is cut to length.

The bellcrank has been pinned into its neutral position to allow sizing of the control rod. The aileron neutral position will be used next to properly position the flap during installation.

rv6a.jpg

The hole in the rear spar is almost to size. I marked a line showing where the edge of the aileron came to, along with other measurements for where the flap will come to.

The process is easy, it just requires removing the control rod, reaming the hole open a little more, reinstalling the control rod, and trying aileron motion to see if you have a big enough hole. Be patient.

rv6a.jpg

rv6a.jpg

The wooden braces are used to align the flaps while the
hinge is installed at the rear. You want to drill the
hinge so that the trailing edges of the aileron and
flap align with about 1/4" between the two components.

rv6a.jpg

The flap is drilled to the hinge and attached to the
overhanging skin from the bottom surface of the wing.
You are not quite ready to rivet yet--you have to add
the flap brace to the trailing wing spar to support the
flap. This is a little tricky because the brace mounts
inside the area where the flap closes, but the brace must
be attached to hold the flap in alignment with the wing
shape.

rv6a.jpg

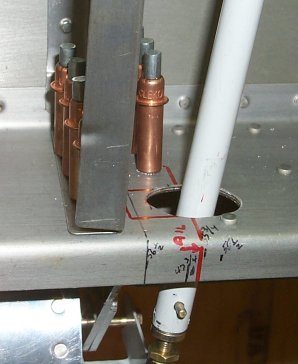
Once you know where the flap brace goes, you put on your safety goggles and drill holes through the brace into the trailing wing spar. (Note the pin has been pulled on the flap hinge so that the flap can be removed. The clecos shown hold half the hinge under the bottom side of the flap brace.) Blind rivets will hold the brace to the spar. Lightening holes are drilled according to the plans to reduce weight and to make it easier to work with the brace during mounting.